
Device Security
Overview
DisplayNet Manager has a number of security features to protect the devices on the system from unauthorized access. They are Claiming, Authentication, and H.26x Stream Security defined below.
Admin privileges are required for changing the security settings, but non-admin users can view the device security settings.
There are two types of security keys in SDVoE: claim keys and authentication keys. We also support the ability to enable/disable H.26x streams on a per-device basis or on all devices of a type.
A factory reset will reset all security settings to their default values including the claim and authentication status of the device.
Admin privileges are required for both enabling and disabling Claim and Auth Key security, as well as for claiming or authorizing devices.
The distinction between claim keys and authentication keys in SDVoE lies in their respective roles:
- Claim keys are used to establish ownership or control over SDVoE devices.
- Authentication keys are utilized for ongoing verification and authentication between devices within the SDVoE network, ensuring secure and authorized communication between components.
Claim Key
A claim key can be used to guard against unauthorized access or control over devices on the network. A claim key is a cryptographic token that enables secure ownership verification, establishing secure communication between the server and the claimed devices on the network. Once a device is claimed, this key is employed to safeguard it, ensuring that only servers equipped with this specific key possess the ability to detect the device on the network. This key is used when claiming devices. When a device is claimed, this key secures the device, so that only servers with the key used can see the device on the network. This prevents rogue servers from controlling the system.
A key of 50 characters is recommended for maximum security.
This key is very important, and should be backed up someplace safe. You will need this key in the event that the server is replaced, otherwise, claimed devices will be inaccessible.
When this key is changed, all claimed devices will be unclaimed, and the API server will restart. Note that any disconnected previously claimed devices will be inaccessible to this server once the key is changed.
Adding a Claim Key to your server
This assumes that you have not yet created a claim key.
- To create a claim key, click the Claim Key "Generate" button in the Device Security Keys section of the Security tab.
- On the modal dialog that appears, click the "Generate Key" button. DisplayNet Manager will generate a random 50 character claim key and will display it under "Device Claim Key:". Copy the key and save it someplace safe.
Note you can use any random ASCII text to create a key, but it must be 50 characters long.
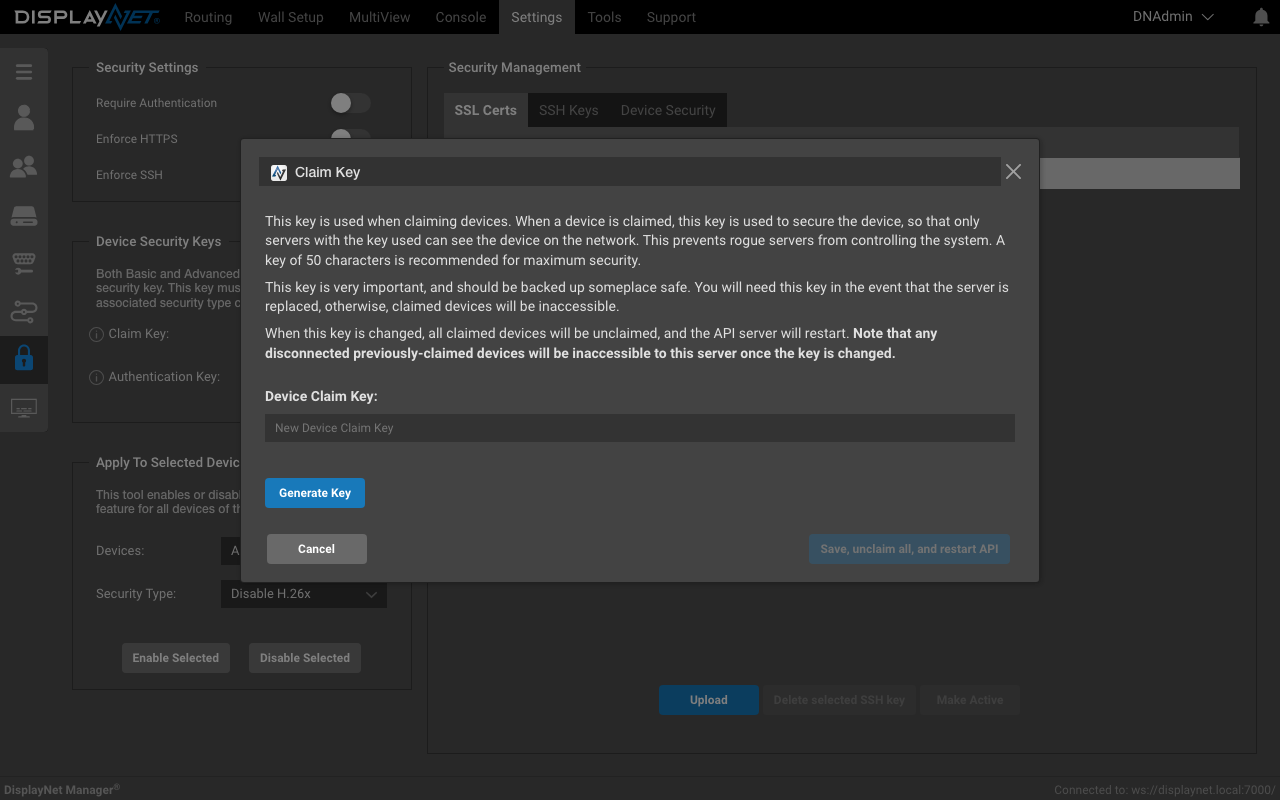
- Click the "Save, unclaim all, and restart API" button to continue. This will trigger the warning dialog below.
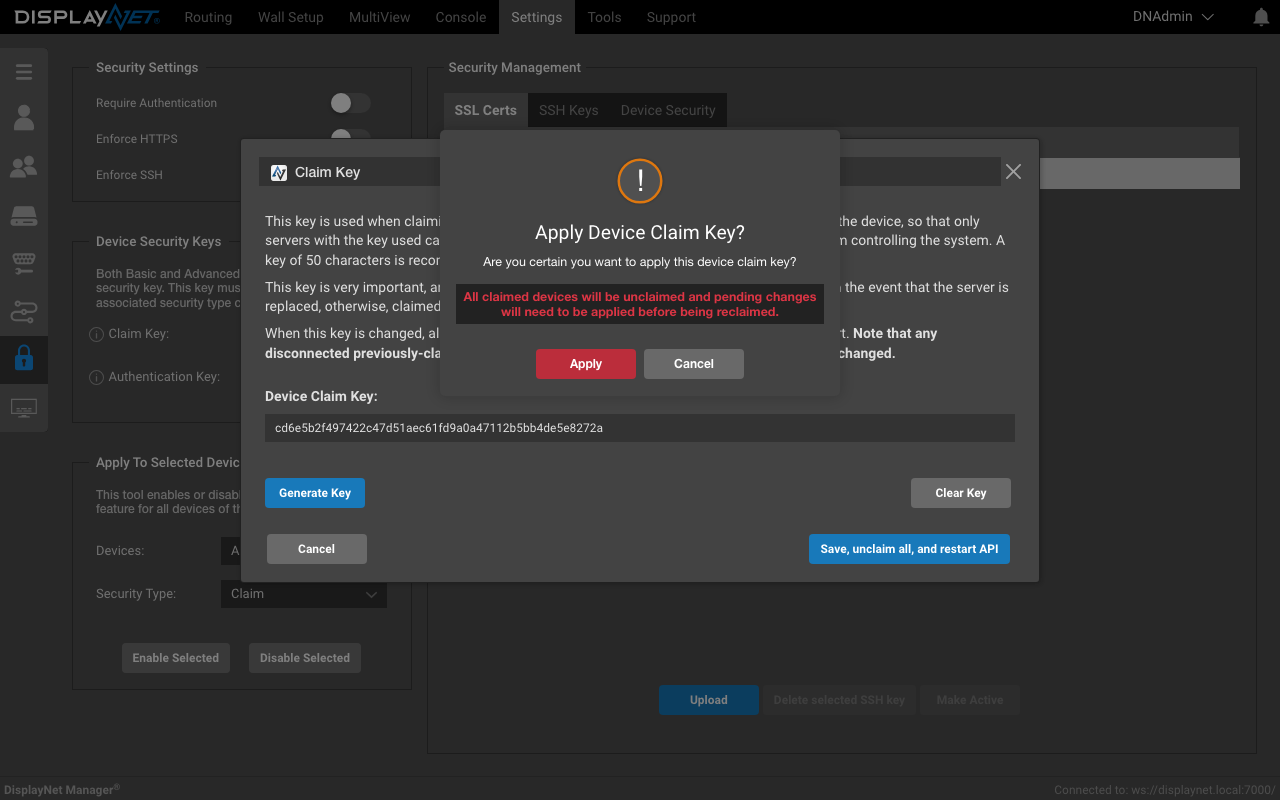
- Click the "Apply" button, and the API server will restart, and all of your server's devices will now be unclaimed.
- Now, you can claim devices on your system
Removing the Claim Key from your server
This assumes that you have already created a claim key.
- Open the "Device Security" tab under the "Security Management" section of the "Settings" tab.
- Click the "Edit" button in the "Claim Key" section.
- Click the "Clear" button in the modal that appears.
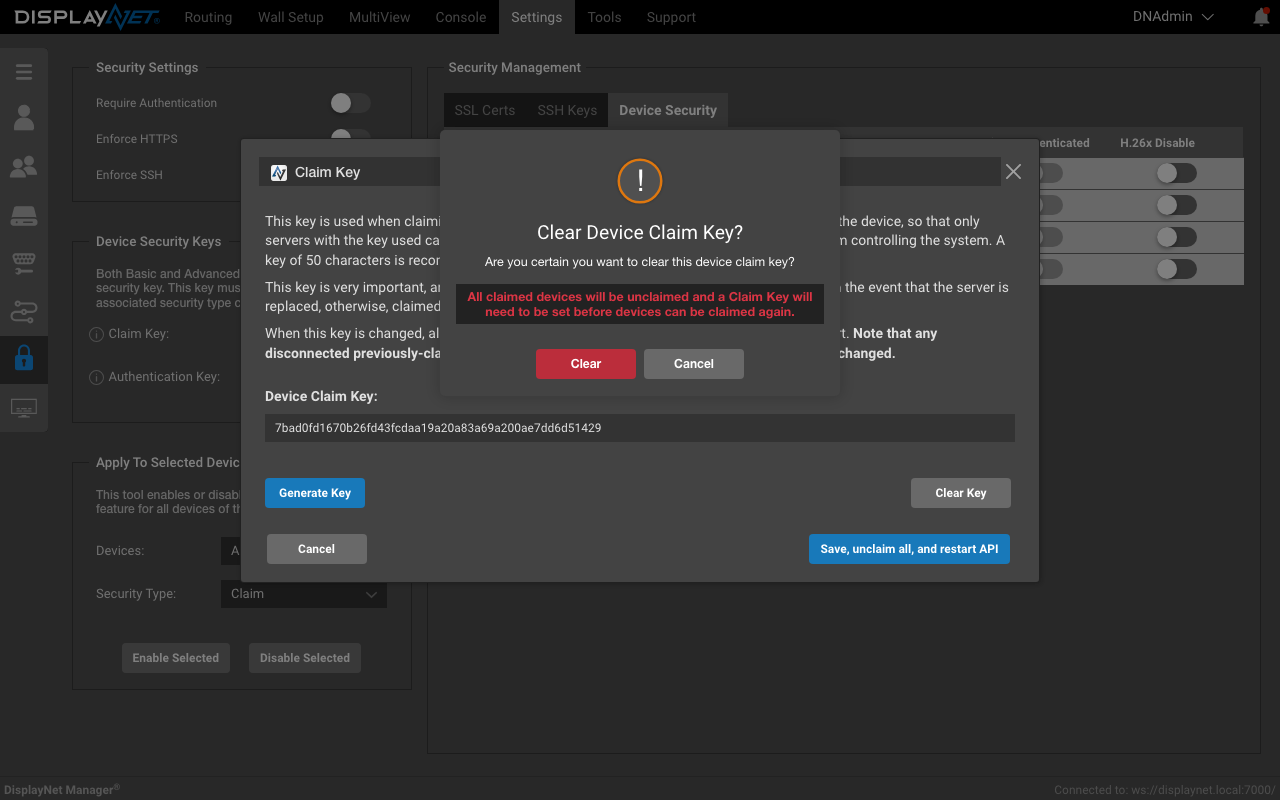
- Your devices will now be unclaimed, and any servers that were previously blocked by the claim key on the network will now be unblocked.
- Your server will now be reset to the default state, which is no devices claimed and no claim key set.
Editing the Claim Key
This assumes that you have already created a claim key.
- Open the "Device Security" tab under the "Security Management" section of the "Settings" tab.
- Click the "Edit" button in the "Claim Key" section.
- Follow the instructions for adding a claim key to your server, above. This will generate a new claim key, and unclaim all of your devices.
Assigning a Claim Key to a device
This assumes that you have already created a claim key.
- Open the "Device Security" tab under the "Security Management" section of the "Settings" tab.
- The "Claimed" toggle for this device will be in the "off" state. Click the toggle to turn it on.
- This device will now be claimed, and only servers with the claim key will be able to see it.
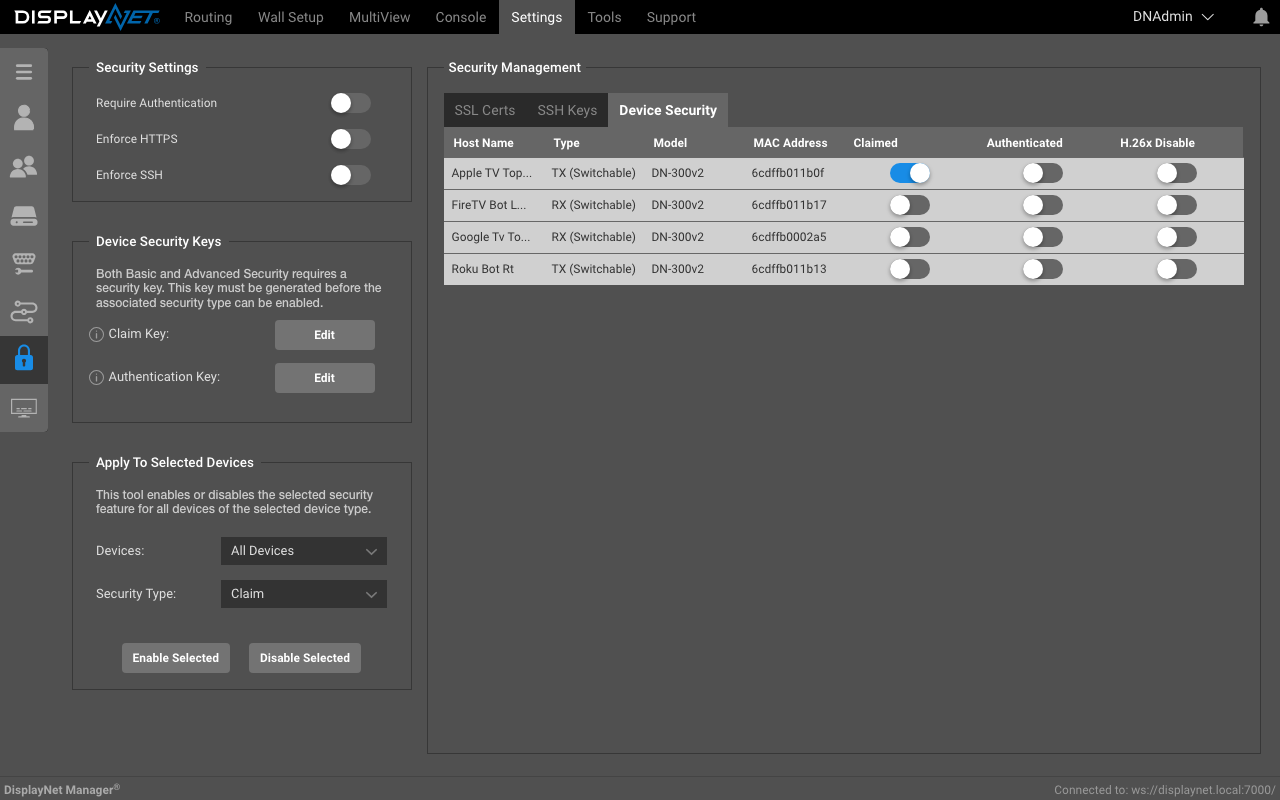
Removing a Claim Key from a device
This assumes that you have already created a claim key and assigned it to a device.
- Open the "Device Security" tab under the "Security Management" section of the "Settings" tab.
- The "Claimed" toggle for this device will be in the "on" state. Click the toggle to turn it off.
- Your device will now be unclaimed, and any servers on the network will be able to see it.
Authentication Key
This key is used when authenticating devices. When a device is authenticated, SDVoE control commands sent to connected devices will be encrypted using this key. This prevents rogue servers from controlling the system, and also prevents the interception of SDVoE API control commands.
This key holds significant importance and must be securely backed up. It will be necessary in case the server is replaced, without which authenticated devices will become unreachable.
When this key is changed, all authenticated devices will be de-authenticated, and the API server will restart. Note that any disconnected previously-authenticated devices will be inaccessible to this server once the key is changed.
Adding an Authentication Key to your server
This assumes that you have not yet created an authentication key.
- To create an authentication key, click the Authentication Key "Generate" button in the Device Security Keys section of the Security tab.
- On the modal dialog that appears, click the "Generate Key" button. DisplayNet Manager will generate a random 64 character authentication key and will display it under "Device Authentication Key:". Copy the key and save it someplace safe.
This option requires an unpredictable alphanumeric string, composed of 0-9 and A-Z (both uppercase and lowercase). It's recommended to use a randomly generated string with 24 to 64 characters. If a string longer than 64 characters is entered, it will be internally truncated to 64 characters.
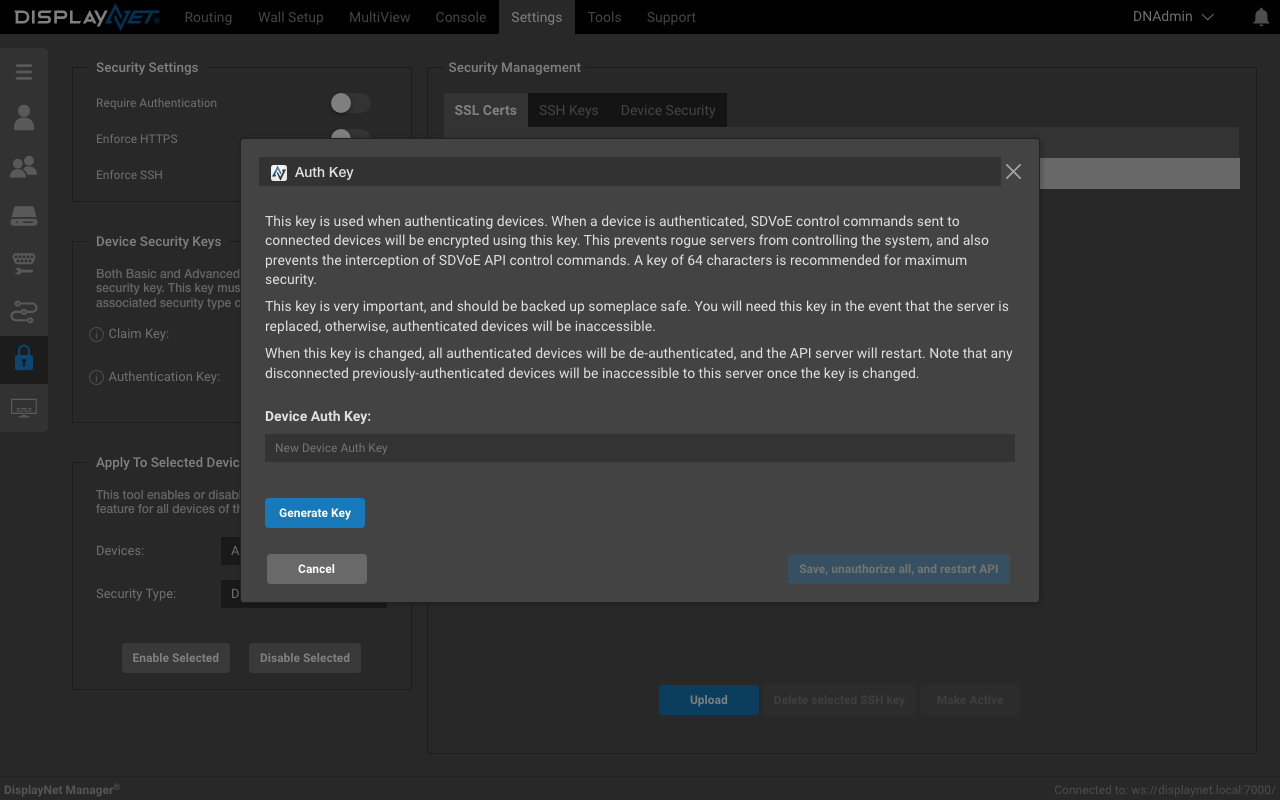
- Click the "Save, unauthorize all, and restart API" button to continue. This will trigger the warning dialog below.
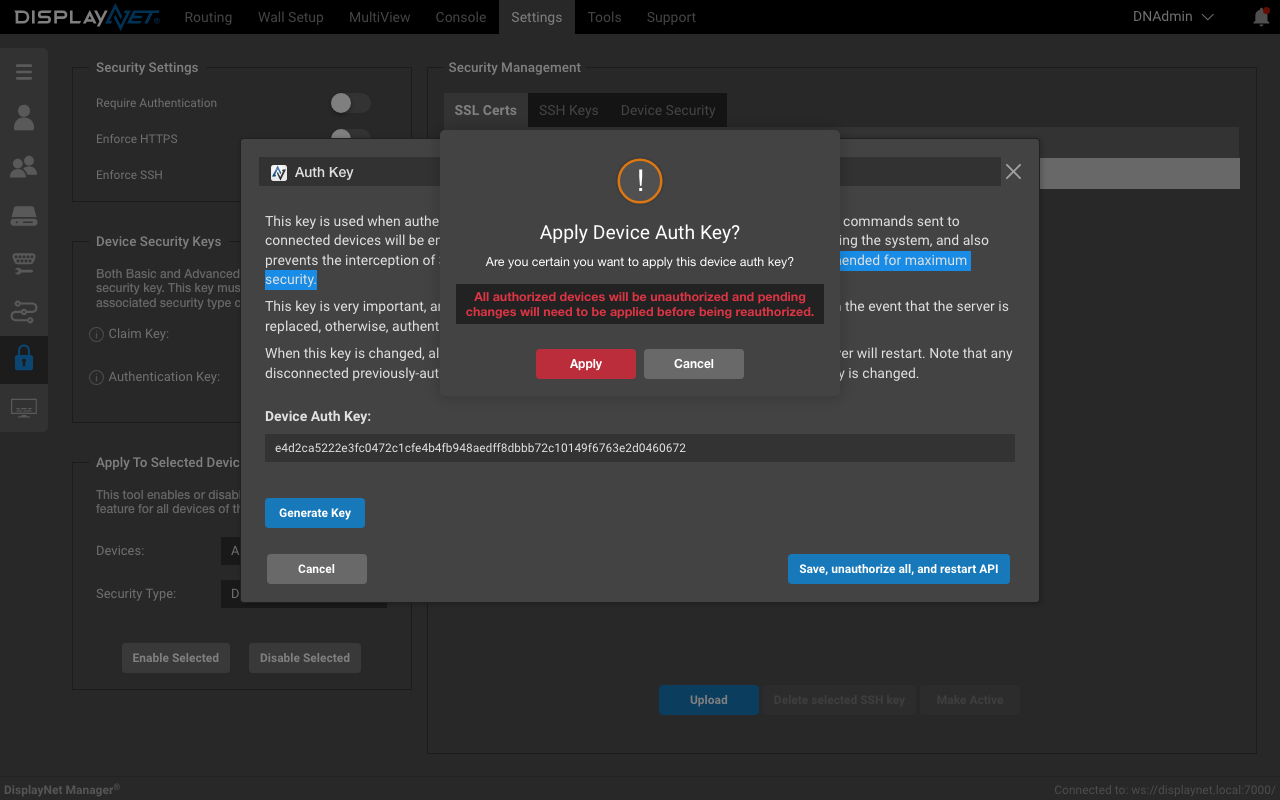
- Click the "Apply" button, and the API server will restart, and all of your server's devices will now be unauthorized.
- Now, you can authorize devices on your system
Removing the Authentication Key from your server
This assumes you already created an Authentication Key
- Open the "Device Security" tab under the "Security Management" section of the "Settings" tab.
- Click the "Edit" button in the "Authentication Key" section.
- Click the "Clear" button in the modal that appears.
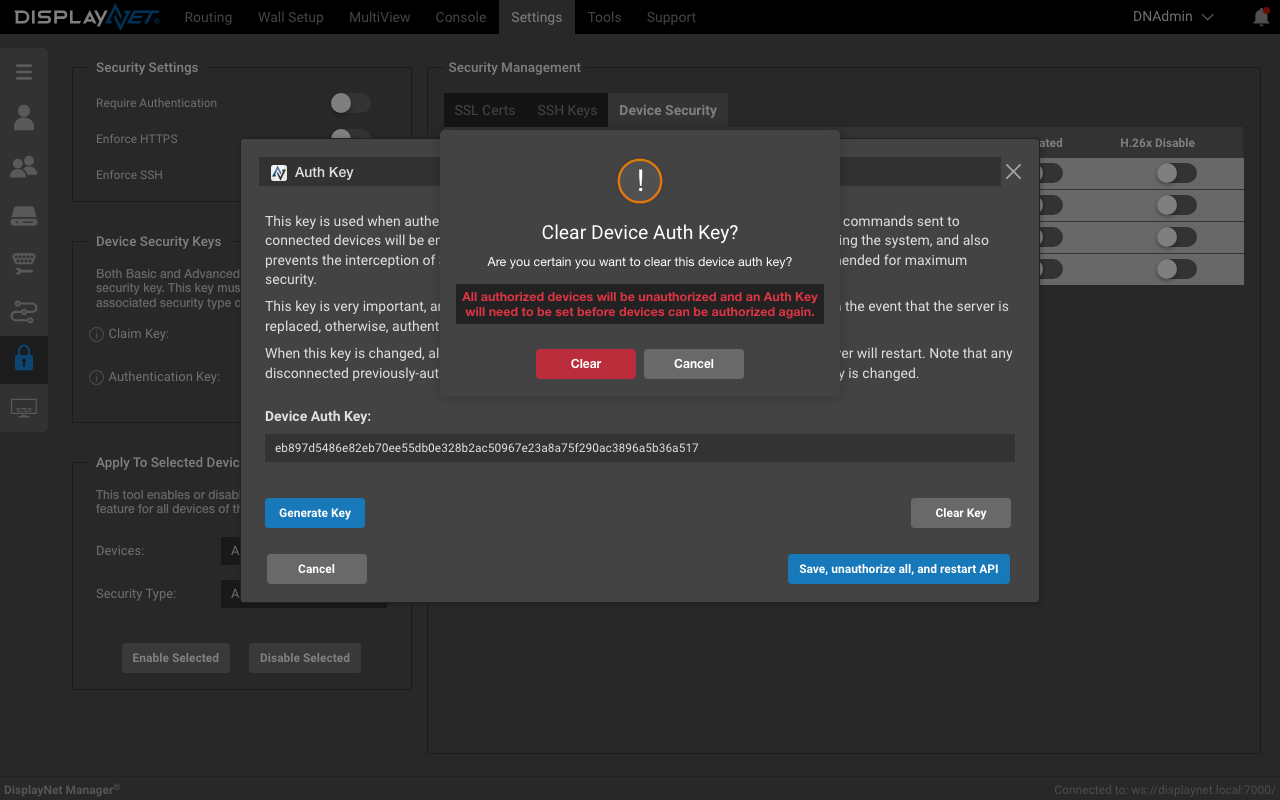
- Your devices will now be unauthorized, and any servers previously blocked by the authentication key on the network will now be unblocked.
- Your server will now be reset to the default state, which is no devices authorized and no authentication key set.
Editing the Authentication Key
This assumes you already created an Authentication Key
- Open the "Device Security" tab under the "Security Management" section of the "Settings" tab.
- Click the "Edit" button in the "Authentication Key" section.
- Follow the instructions for adding an authentication key to your server, above. This will generate a new authentication key, and unauthorize all of your devices.
Assigning an Authentication Key to a device
This assumes you already created an Authentication Key
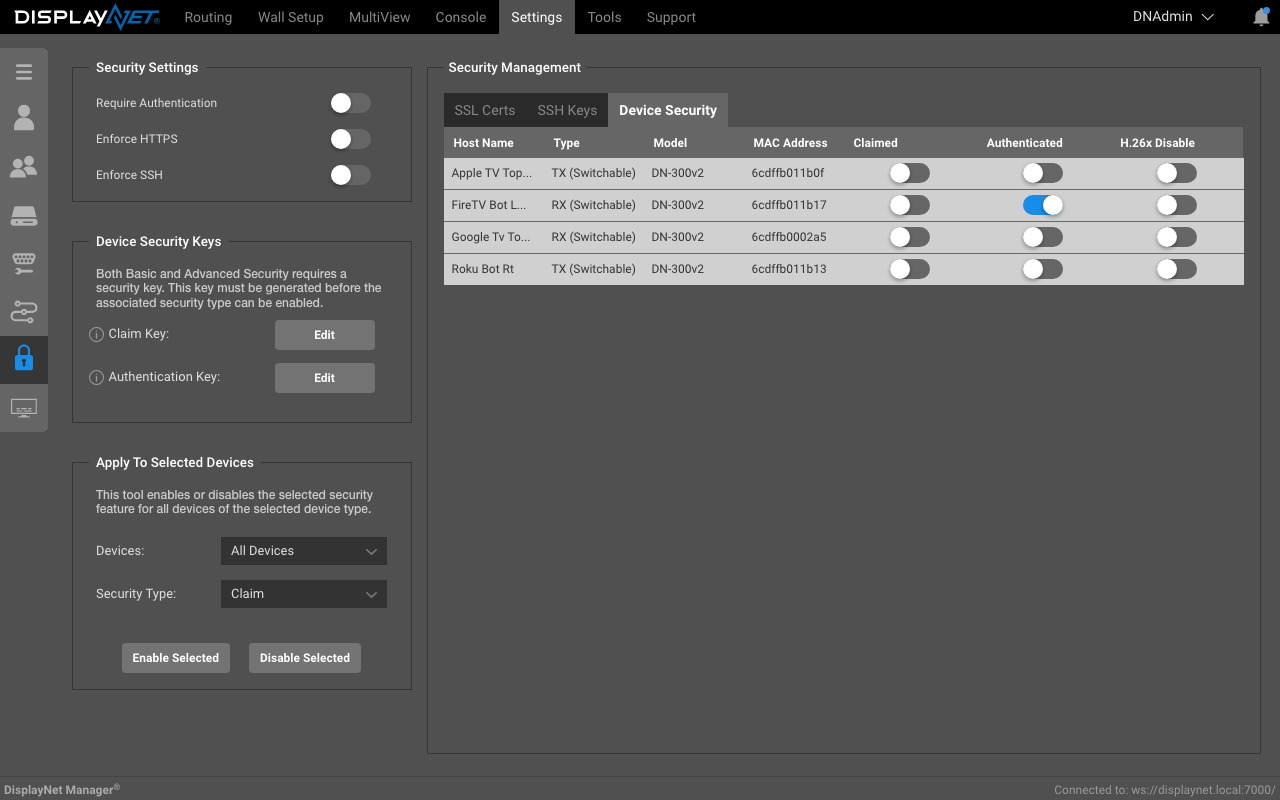
- Open the "Device Security" tab under the "Security Management" section of the "Settings" tab.
- The "Authorized" toggle for this device will be in the "off" state. Click the toggle to turn it on.
- This device will now be authorized, and only servers with the authentication key will be able to send encrypted SDVoE control commands to it.
Removing an Authentication Key from a Device
This assumes you already created an Authentication Key and assigned it to a device
- Open the "Device Security" tab under the "Security Management" section of the "Settings" tab.
- The "Authorized" toggle for this device will be in the "on" state. Click the toggle to turn it off.
- This device will now be unauthorized, and any servers on the network will be able to send encrypted SDVoE control commands to it.
H.26x Stream Security
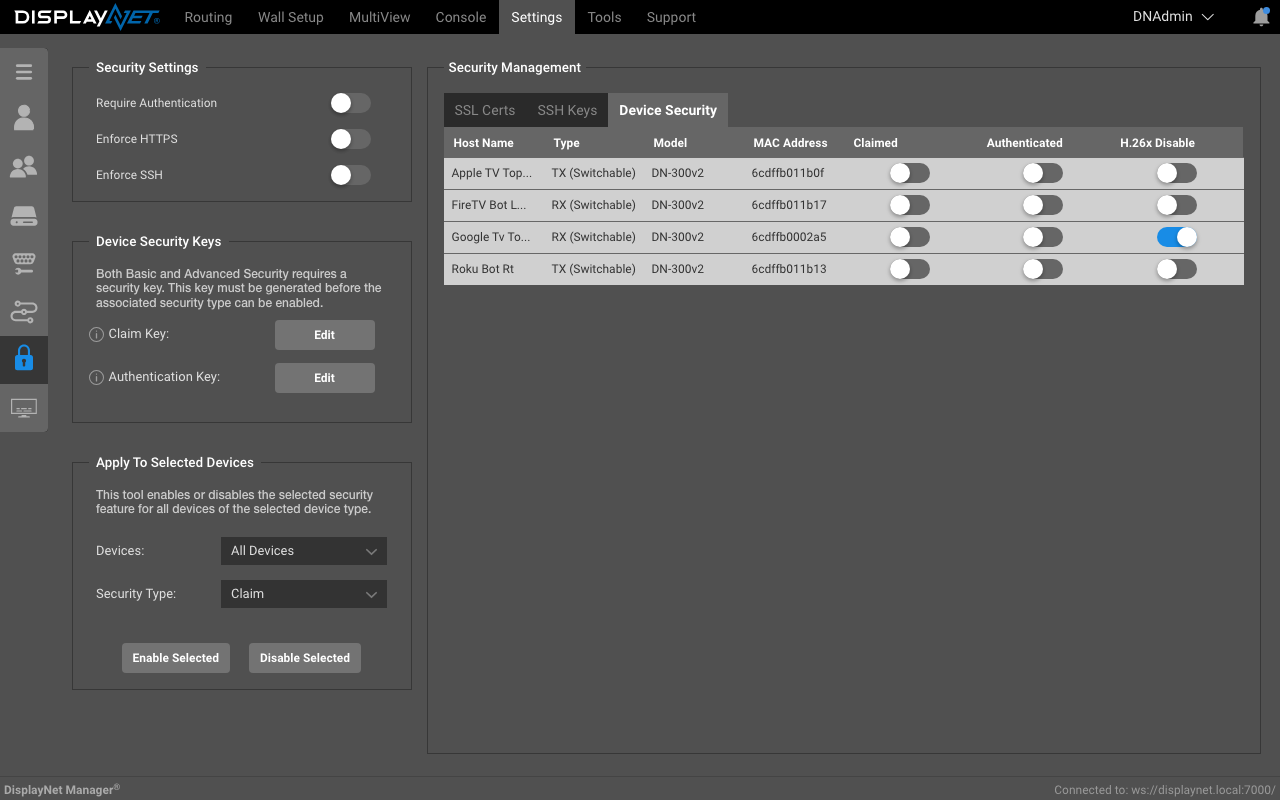
Enabling/Disabling H.26x Stream Security on a Device
- Open the "Device Security" tab under the "Security Management" section of the "Settings" tab.
- The "H.26x Disable" toggle for this device will be in the "off" state. Click the toggle to turn it on.
- This device's H.26x stream will now be disabled, and this stream will no longer be available.
Enabling/Disabling H.26x Stream Security on all Devices of a Type
This assumes you have already disabled the H.26x Stream Security on a Device
- Open the "Device Security" tab under the "Security Management" section of the "Settings" tab.
- The "H.26x Disable" toggle for this device will be in the "on" state. Click the toggle to turn it off.
- This device's H.26x stream will now be enabled, and this stream will now be accessible.
Assigning Device Security Keys to Multiple Devices at Once
There are three types of device security keys that can be assigned to devices:
- Claim Key
- Authentication Key
- H.26x Stream Enabling/Disabling
There are three main ways to manage device security within DisplayNet Manager:
- On a per-device basis (described above)
- On all devices of a type (described below)
- On all devices at once (described below)
Applying Device Security Keys to all Devices of a Type or All Devices At Once
- Open the "Device Security" tab under the "Security Management" section of the "Settings" tab.
- Find the section title "Apply To Selected Devices"
- In this section, you will find two dropdowns: "Devices" (referring to the Device Type to which to apply the changes) and "Security Type" (referring to the type of security to apply).
- Select the device type to which to apply the changes from the "Devices" dropdown. The options are "All Tx", "All Rx" and "All Devices".
- Select the type of security to apply from the "Security Type" dropdown. The options are "Claim", "Auth", and "Disable H.26x".
- Click the "Enable Selected" button to apply the changes to all devices of the selected type.
- Click the "Disable Selected" button to remove the changes from all devices of the selected type.
If the security options for Claim Key or Authentication Key have not been configured, the corresponding options to apply Claim or Auth will not be available.
- Open the "Device Security" tab under the "Security Management" section of the "Settings" tab.
- Find the section title "Apply To Selected Devices"
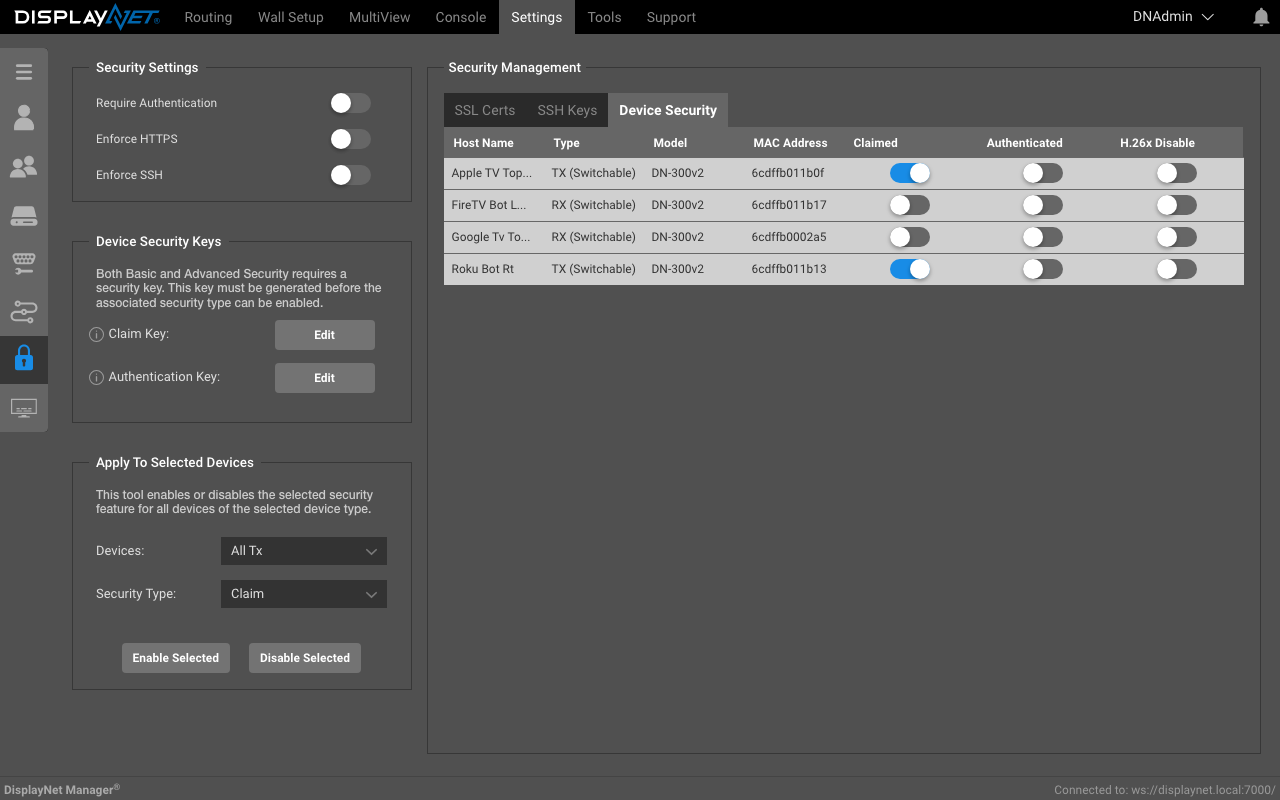
- In the "Devices" dropdown, select "All Tx"
- In the "Security Type" dropdown, select "Claim"
- Click the "Enable Selected" button to apply the Claim Key to all transmitters on the system.
This will claim all transmitters on the system, and only servers with the claim key will be able to see them.
Below, you can see the result showing that the Claim Key has been applied to all transmitters on the system.
It is normal and expected that these devices will disconnect and reconnect to the system while they are claimed by a server with the claim key.